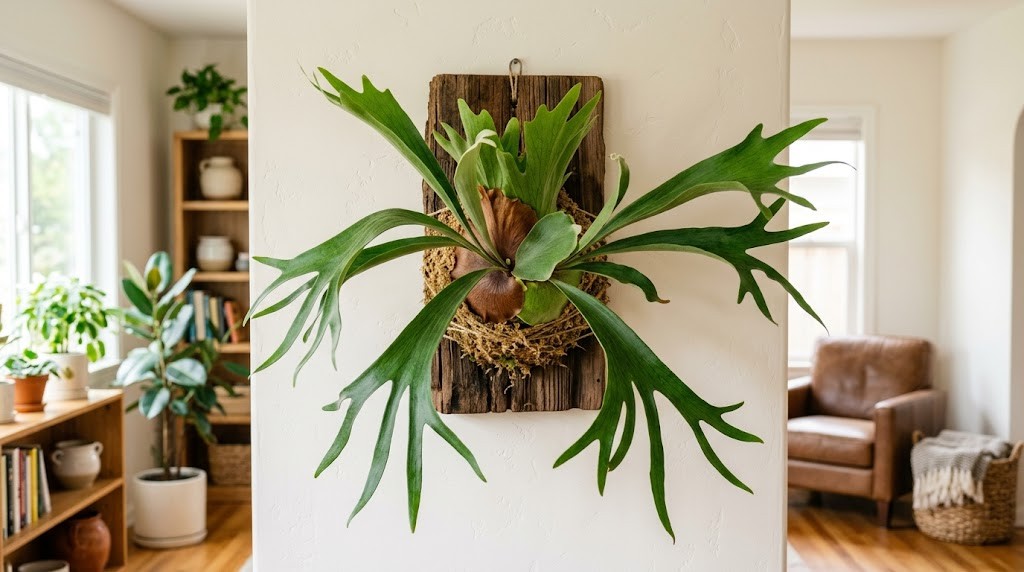
Potted houseplants on windowsills are lovely, but nothing transforms a room quite like a living, three-dimensional botanical installation. Among the most dramatic choices for vertical greenery is the mounted staghorn fern (Platycerium). With massive, crown-like shield fronds and antler-shaped foliage that cascades outward, a mounted fern looks less like a typical houseplant and more like a high-end sculptural piece found in a contemporary design magazine.
Yet, many plant enthusiasts who purchase a staghorn fern in a standard plastic pot notice it quickly struggles. The fronds turn mushy, growth stalls, and root rot sets in. The reason is simple: staghorn ferns are not terrestrial plants. Expecting them to thrive packed tightly in standard potting soil goes against millions of years of evolutionary adaptation. In their native habitats—tropical rain forests across Australia, Southeast Asia, and South America—these magnificent specimens grow high above the ground as epiphytes, anchoring themselves to rainforest canopies and tree trunks.
Mounting your staghorn fern on a wooden plaque mimics its natural growing environment, allowing air to circulate freely around its root system while giving your space an extraordinary focal point. In this comprehensive, step-by-step masterclass, you will learn the exact biological mechanics of the Platycerium, how to prepare the ideal mounting surface, how to execute a professional-grade mount, and how to keep your living wall art thriving for decades.
The Biology of Epiphytes: Why Mounting Saves Your Fern

To successfully care for a mounted staghorn fern, you must first understand how its anatomy functions in nature. Epiphytes are plants that grow non-parasitically upon other physical structures, such as trees, rocks, or wooden branches, deriving moisture and nutrients from the air, rain, and accumulating organic debris.
Unlike garden ferns that draw moisture through subterranean soil, a staghorn fern relies on two distinctly different types of fronds, each serving a critical role in its survival:
1. Shield Fronds (Basal Fronds)
The flat, round, papery leaves at the base of the plant are known as shield or basal fronds. When young, these fronds are bright green and pliable, wrapping tightly around the root mass to anchor the plant to its supporting tree branch. As they age, they turn papery and dark brown.
Critical Expert Insight: Never remove or cut away brown shield fronds. Beginners often mistake this natural browning for plant death and trim them off, which strips the fern of its natural defense system. These dead shield fronds form a protective, moisture-retaining shell around the delicate root system, serving as a catchment zone for fallen leaves and debris that break down into organic fertilizer.
2. Antler Fronds (Foliage Fronds)
The long, deeply lobed, antler-like green fronds that emerge from the center of the shield are responsible for photosynthesis and spore production. The undersides of mature antler fronds often produce felt-like, brown patch areas near their tips. These are sporangia (spore-bearing structures), not a pest infestation like scale or mealybugs. Additionally, these fronds are covered in tiny, fine white hairs called stellate hairs. These hairs act as natural water absorbers and shield the leaf tissue from harsh, direct sunlight. Avoid scrubbing or wiping off this dusty white coating.
When you plant a staghorn fern in standard heavy potting soil, the dense substrate holds excessive moisture around the root core, cutting off oxygen flow. The root system suffocates, leading to rapid fungal decay. Mounting the fern onto a wooden plaque or bark slab re-establishes root aeration, replicates canopy airflow, and eliminates the root rot issues common in potted epiphytes.
Planning & Preparation: Tools, Surfaces, and Materials
Executing a clean, long-lasting mount requires assembling the right materials before you get your hands dirty. Using improper materials—such as untreated pine boards that warp or iron nails that rust—can compromise your display within months.
Essential Supply Checklist
-
Staghorn Fern: Platycerium bifurcatum is the most resilient, beginner-friendly species available. Other popular varieties include Platycerium superbum and Platycerium veitchii.
-
Mounting Surface: A piece of rot-resistant hardwood, cedar slab, teak board, or natural cork bark (minimum 1 to 1.5 inches thick).
-
Sphagnum Moss: High-grade, long-strand sphagnum moss. This serves as the primary reservoir for water and humidity around the roots.
-
Orchid Bark Chips (Optional): Chunky fir bark mixed with moss creates additional aeration pockets within the root zone.
-
Binding Line: 20-lb to 30-lb test clear monofilament fishing line or green coated floral wire. Avoid cotton twine or natural jute, as organic lines degrade and break within months from moisture exposure.
-
Anchoring Hardware: 8 to 12 galvanized or stainless steel screws/nails (1 to 1.5 inches long).
-
Hanging Hardware: Heavy-duty D-ring picture hangers or sawtooth brackets rated for at least 15–20 pounds.
-
Tools: Screwdriver or power drill, hammer, scissors, a large basin for soaking moss, and heavy-duty work gloves.
Materials Breakdown
Selecting and Treating Your Mounting Board
Your mounting plaque must withstand weekly water submersions for years without splitting, rotting, or leaching toxins into the plant.
-
Best Wood Species: Western Red Cedar, Redwood, Cypress, White Oak, and Teak are naturally rich in oils that repel wood-rotting fungi and insects. Repurposed teak cutting boards or natural cork bark slabs also work exceptionally well.
-
Wood to Avoid: Untreated pine, medium-density fiberboard (MDF), plywood, and pressure-treated lumber. MDF and plywood delaminate rapidly when wet, while pressure-treated wood contains chemical preservatives that can harm sensitive fern roots.
-
Sealing Strategy: Protect the back face of your wooden board with a coat of food-safe mineral oil, tung oil, or beeswax. This prevents moisture from seeping into your interior drywalls when the display is rehung. Leave the front face raw where the moss bed rests so the wood can breathe naturally.
Step-by-Step Guide: How to Mount a Staghorn Fern
Follow these detailed steps to transition your plant from its nursery pot to a stable, visually striking vertical display.
Step 1: Install Hanging Hardware and Anchor Screws
Prepare the mounting plaque before placing any moist plant tissue on the wood.
-
Flip your wooden board to the back side and attach two heavy-duty D-ring hangers near the top corners. Ensure they are aligned evenly and secured with rust-resistant screws.
-
Flip the board to the front face. Place your potted staghorn fern in the center of the board to gauge how much space its root ball will occupy.
-
Using a pencil, lightly trace a circle around the perimeter of the root ball, adding roughly 2 inches of space all the way around.
-
Drive 8 to 12 galvanized screws into the wood along the pencil line, spacing them evenly in a circle. Leave 1/4 inch to 1/2 inch of each screw head protruding above the surface. These screws will act as anchor posts for your fishing line.
Step 2: Prepare the Sphagnum Moss Cushion
A proper sphagnum moss base holds moisture while allowing air to reach the roots.
-
Place long-strand sphagnum moss into a large bucket filled with warm water. Allow it to soak for 15 to 20 minutes until completely saturated.
-
Grab handfuls of the wet moss and squeeze firmly until it is damp like a wrung-out sponge, rather than dripping wet.
-
Layer the moss inside the ring of screws on your board, creating a circular nest or doughnut shape about 1 to 2 inches thick.
-
Expert Tip: Mix a handful of coarse orchid bark chips into the center of the moss nest. This increases structural air pockets and mimics the rough bark surface of a host tree in nature.
Step 3: Unpot and Prepare the Root Mass
Work carefully during this stage to protect the root core and lower shield fronds.
-
Gently squeeze the sides of the nursery pot to loosen the soil, then slide the staghorn fern out while supporting the base of the fronds.
-
Carefully tease away 50% to 70% of the excess nursery soil around the bottom and sides of the root ball. Do not tear or cut the primary root mass directly beneath the shield frond.
-
Gently press the loosened root mass into a flatter, hockey-puck shape. A flattened root ball sits snug against the moss bed instead of protruding far off the board, making it easier to wrap securely.
Step 4: Correct Plant Orientation

Mounting a staghorn fern upside down is a common mistake that can lead to health issues over time. In nature, the fern’s shield fronds form an upward-facing cup to catch falling rainwater and forest leaf litter.
-
Examine the shield fronds. Locate the open notch or ruffled top lip of the newest shield frond.
-
Position the plant on your moss bed so this open notch faces straight UP toward the top of the wooden board (where your D-ring hangers are located).
-
Ensure the long, branching antler fronds cascade outward and slightly DOWNWARD.
-
If oriented upside down, new shield fronds will attempt to curl inward toward the wall, trapping water pockets against the board and causing the root growth point to rot.
Step 5: Secure the Fern with Monofilament Line
Proper wrapping technique holds the heavy root mass in place while keeping the line hidden from view.
-
Tie one end of your 20-lb to 30-lb clear monofilament fishing line securely to one of the perimeter anchor screws with a triple knot.
-
Place a light, secondary layer of damp sphagnum moss over the sides and upper edge of the root ball to cover exposed roots.
-
Begin weaving the fishing line across the root ball in a crisscross, figure-eight pattern. Pull the line taut and catch it around opposite anchor screws as you traverse the board.
-
Safety Rule: Wrap the line ONLY over the moss layer and the flat, papery outer edges of the shield frond. NEVER run the line directly over the central growing eye (the soft, fuzzy center point where new fronds emerge) or across delicate green antler fronds. Cinching line across the growing point will crush emerging tissue and kill the plant.
-
Continue weaving 15 to 20 passes until the root ball feels completely stable. Test the security by tilting the board vertically; the plant should not shift or sag away from the wood.
-
Once secure, wrap the line tight around a screw head, knot it three times, and snip the excess. Use a screwdriver to turn the anchor screws flush down against the board, securing the line permanently in place.
Environmental Setup & Post-Mounting Care
Now that your staghorn fern is mounted, placing it in the proper environmental conditions will help it establish its roots within the moss plaque.
Light Requirements
Staghorn ferns need bright, indirect light to thrive indoors.
-
Ideal Exposure: An east-facing window that receives gentle morning light, or set back 3 to 5 feet from a south- or west-facing window behind sheer curtains.
-
Light to Avoid: Harsh, direct midday sun will scorch the delicate foliage and dry out the moss bed within hours. Conversely, deep shade leads to dark green, floppy fronds and slows water uptake, raising the risk of root rot.
-
Artificial Lighting: If natural light is limited, place your display 12 to 18 inches below a full-spectrum LED grow light set to an 11- to 14-hour daily timer.
Temperature and Humidity
Hailing from tropical and subtropical climates, Platycerium species prefer warm, humid environments.
-
Temperature: Keep room temperatures between 60°F and 80°F (15°C to 27°C). Keep your mounted fern away from cold drafts near exterior doors or air conditioning vents, as well as heating radiators.
-
Humidity: Target ambient indoor humidity levels between 50% and 70%. If your home dries out during winter, run a cool-mist room humidifier nearby or hang your mounted fern in a brightly lit bathroom, where shower steam provides natural humidity.
Mastering the Dunk-and-Drain Watering Method
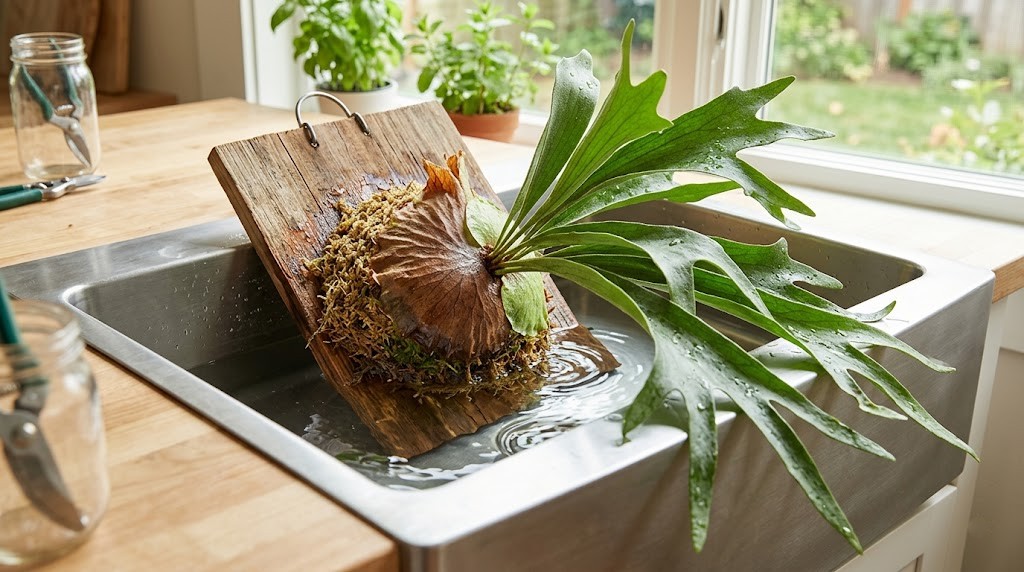
Watering a mounted plant is different from watering traditional potted houseplants. Surface misting with a spray bottle is not enough, as misting only dampens the top layer of moss while leaving the inner root core dry.
To ensure your fern stays properly hydrated, use the Submersion Method:
Step-by-Step Submersion Protocol
-
Check for Dryness: Touch the sphagnum moss base. When the outer layer feels firm and dry to the touch, it is time to water.
-
Remove from Wall: Unhook the wooden plaque from the wall and transport it to a large sink, bathtub, or wide basin.
-
Submerge: Place the plaque face-down in 2 to 3 inches of room-temperature water. Ensure the entire moss ball and root mass are submerged. Allow the wood board to float while the roots soak for 15 to 20 minutes.
-
Drip-Dry Thoroughly: Lift the plaque out of the water and let it hang over the sink or shower for 30 to 45 minutes. Wait until water stops dripping from the bottom edge of the board before rehanging it on your indoor wall.
Seasonal Watering Schedule
-
Spring and Summer (Active Growth): Submerge every 7 to 10 days, as higher temperatures and faster growth cause the moss bed to dry out more quickly.
-
Fall and Winter (Dormancy): Submerge every 14 to 21 days, as ambient temperatures drop and daylight hours shorten, slowing water consumption significantly.
Fertilizer & Nutrition Requirements
In their natural habitat, staghorn ferns receive a steady stream of nutrients from decomposing leaves, rainwater minerals, and organic debris trapped behind their shield fronds. Indoors, they require supplemental feeding during their active growing season.
-
Frequency: Feed once per month from early spring through early autumn. Do not fertilize during winter.
-
Fertilizer Selection: Use a balanced, water-soluble houseplant liquid fertilizer (such as 10-10-10) or an orchid fertilizer formulation.
-
Application Method: Dilute the liquid fertilizer to half or quarter strength directly into the basin water during your monthly submersion routine. This allows the moss and root mass to absorb nutrients evenly.
-
Banana Peel Technique (Organic Method): A popular organic trick among collectors is tucking a small piece of organic banana peel directly behind the brown shield frond. As the peel breaks down, it releases a gentle, steady supply of potassium directly into the root zone. Replace the peel piece every few months.
Troubleshooting Common Issues

Even with careful attention, your mounted staghorn fern may occasionally show signs of stress. Use this diagnostic matrix to identify and correct issues quickly:
Pest Management
Mounted staghorn ferns are generally pest-resistant, but they can occasionally attract scale insects or mealybugs in low-humidity environments.
-
Scale Insects: Look like small, brownish, waxy bumps along the veins of antler fronds. Dip a cotton swab in 70% isopropyl rubbing alcohol and dab each insect individually to break down its waxy shell.
-
Mealybugs: Look like small, white cotton-like clusters near the base of the fronds. Treat them with alcohol swabs or spray the affected foliage with ready-to-use insecticidal soap. Avoid harsh chemical sprays, which can damage the fine stellate hairs on the fronds.
Frequently Asked Questions
Q1: Can I mount a staghorn fern without removing its brown shield fronds?
Yes, absolutely. You should never remove or cut away the brown shield fronds. These fronds protect the delicate root system from physical damage and dehydration. Simply tease away excess soil from behind the shield frond base and mount the entire plant structure directly onto the moss bed.
Q2: How long can a mounted staghorn fern live on a board?
With proper light and watering care, a mounted staghorn fern can live on the same wooden plaque for 3 to 5 years. Over time, the plant will produce side-shoots called “pups” and expand across the board. Once the fern outgrows its original mounting base, you can mount it onto a larger wooden plaque or divide the pups to create new individual mounts.
Q3: Will a mounted fern damage my indoor walls?
Not if prepared correctly. Always allow the wooden plaque to drip-dry completely in a sink or shower for 30 to 45 minutes after submersion before hanging it back on your wall. Installing adhesive felt bumpers on the back corners of the board creates a small air gap between the wood and your drywall, preventing moisture transfer and scuff marks.
Q4: What type of wood is best for mounting a staghorn fern?
Naturally rot-resistant hardwoods such as Western Red Cedar, Redwood, White Oak, Cypress, and Teak are ideal options. These woods withstand repeated water submersions without warping, cracking, or developing mold issues over time.
Conclution: Creating Your Botanical Living Wall

Mounting a staghorn fern brings a unique, vertical element into your home plant display. By transitioning this tropical epiphyte from a dense pot onto a wooden plaque, you honor its natural habits, support its root health, and create a long-lasting piece of living art.
Start with a sturdy rot-resistant board, establish a healthy damp sphagnum moss base, secure your plant tightly with monofilament line, and stick to a steady soaking routine. Over time, your Platycerium will wrap its shield fronds around the board, anchoring itself securely and growing into an eye-catching focal point for your indoor jungle.