Are your indoor plants starting to look a little stressed? 🌱 If their growth has slowed down, leaves are turning yellow, or roots are creeping through the drainage holes, it might be time to repot them. But don’t worry—repotting isn’t as complicated as it sounds! In fact, when done correctly, it can breathe new life into your plants, making them healthier and more vibrant.
In this guide on how to repot indoor plants, we’ll walk you through everything you need to know—from identifying when it’s time to repot to choosing the right pot and soil. Whether you’re a beginner or an experienced plant parent, this simple, step-by-step approach will help you create an ideal environment for your plants to thrive. Ready to give your greenery the upgrade it deserves? Let’s dive in! 😊
Why Repotting Your Indoor Plants Is Crucial
Repotting your indoor plants is essential for their growth and overall health. Over time, plants can outgrow their pots or the soil can become depleted of nutrients, both of which can stunt their development. If you’ve noticed your plant slowing down, struggling to grow, or showing signs of stress, repotting might be the solution it needs! 🌱
Here’s why repotting is so crucial:

1. Room for Growth
As plants grow, their roots need more space to expand. When the roots become overcrowded, they can become tangled, reducing the plant’s ability to absorb nutrients and water. Repotting gives the roots the space they need to grow freely, encouraging healthy, robust growth.
2. Better Soil Quality
Soil doesn’t last forever. Over time, it can lose its nutrients, leading to poor plant health. By repotting, you replace the old, nutrient-depleted soil with fresh potting mix, giving your plant a much-needed nutrient boost.
3. Prevention of Root Rot
When a plant’s roots fill the pot, water can’t drain properly, increasing the risk of root rot. Repotting into a larger pot with good drainage helps prevent this, keeping the roots healthy and ensuring your plant thrives. 💧
4. Improved Water Retention
A new pot with fresh, well-draining soil will help regulate moisture levels. Your plant will benefit from more consistent water levels, preventing both underwatering and overwatering, two common plant problems.
Repotting your indoor plants isn’t just a maintenance task—it’s a chance to give your plant a fresh start, allowing it to grow to its full potential. By following a few simple steps, you can ensure your plants stay healthy and vibrant for years to come. 🌿
Signs Your Indoor Plant Needs Repotting
Not sure if your plant needs a new pot? Don’t worry—there are several easy-to-spot signs that it’s time to repot. If you catch these indicators early, you can help your plant thrive and continue to grow strong! 🌿

1. Roots Are Visible Above the Soil or Through the Drainage Holes
If you notice roots pushing through the top of the soil or poking out from the bottom of the pot, it’s a clear sign your plant has outgrown its home. This overcrowding can limit growth and reduce the plant’s access to nutrients.
2. Plant Growth Has Slowed Down
A healthy plant should show steady growth. If your plant has stopped growing or its growth seems stunted, it could be because its roots no longer have room to expand. Repotting into a larger container with fresh soil will give it the space it needs to flourish again. 🌱
3. Soil Dries Out Too Quickly
If you’re finding that your plant’s soil dries out within a day or two after watering, it may indicate that the roots are taking up too much space. Overcrowded roots absorb water more quickly than the soil can retain it, leading to dry conditions for the plant.
4. Yellowing or Dropping Leaves
When a plant’s roots can no longer support it, the entire plant can become stressed. Yellowing leaves, browning edges, or dropping leaves are common signs of root overcrowding or poor soil quality. Repotting will help restore its health and keep the plant looking lush. 🍃
5. The Plant Is Top-Heavy or Leans to One Side
If your plant seems to be tipping over or growing unevenly, it might be because the roots are not stable enough to support it. Repotting into a larger pot with better soil will provide the needed support and help balance the plant.
Recognizing these signs early can prevent stress on your plant and help it thrive. If you’re seeing any of these issues, it’s time to repot—and your plant will thank you for it! 🌿
Choosing the Right Pot for Repotting
Choosing the right pot is one of the most important steps when repotting indoor plants. A well-chosen pot will promote healthy root growth and ensure your plant thrives for years to come. Here’s how to pick the perfect pot for your plant’s needs:

1. Size Matters: Choose a Pot 1-2 Inches Larger
When repotting, it’s crucial to choose a pot that’s only slightly larger than the current one—about 1-2 inches in diameter. A pot that’s too big can lead to overwatering and root rot since the plant’s roots will struggle to take up water efficiently in the extra space. Think of it as giving your plant just enough room to grow without overwhelming it. 🌿
2. Look for Proper Drainage
Drainage holes are a must! Without them, excess water will build up in the soil, leading to root rot. Ensure the pot has at least one or two drainage holes at the bottom to allow water to escape. If your pot doesn’t have holes, consider drilling some yourself or choosing a different one. 💧
3. Choose the Right Material
Pots come in a variety of materials, each with its own benefits:
- Plastic Pots: These are lightweight, affordable, and retain moisture well, making them great for plants that prefer consistently moist soil.
- Ceramic Pots: While they are heavier and often more decorative, ceramic pots allow for better airflow and drainage, which is perfect for plants that prefer dry conditions between waterings.
- Terracotta Pots: These clay pots are porous and allow soil to dry out quickly, making them ideal for succulents or cacti that dislike too much moisture.
4. Consider Plant-Specific Needs
Not all plants are the same—choose a pot that fits your plant’s specific needs. For instance, succulents thrive in shallow, well-draining pots, while tropical plants prefer deeper pots that retain moisture. Make sure the pot matches the type of plant you’re repotting! 🌵
5. Aesthetic and Practicality
While the pot’s functionality is the priority, aesthetics matter too. Choose a pot that complements your home’s decor, but make sure it’s practical first. Remember, the plant’s health comes first, so avoid overly decorative pots that lack drainage or are too large for your plant.
With these tips, you can confidently choose the right pot that will help your plant thrive. A perfect fit means your plant will have the space and care it needs to grow strong and healthy! 🌱
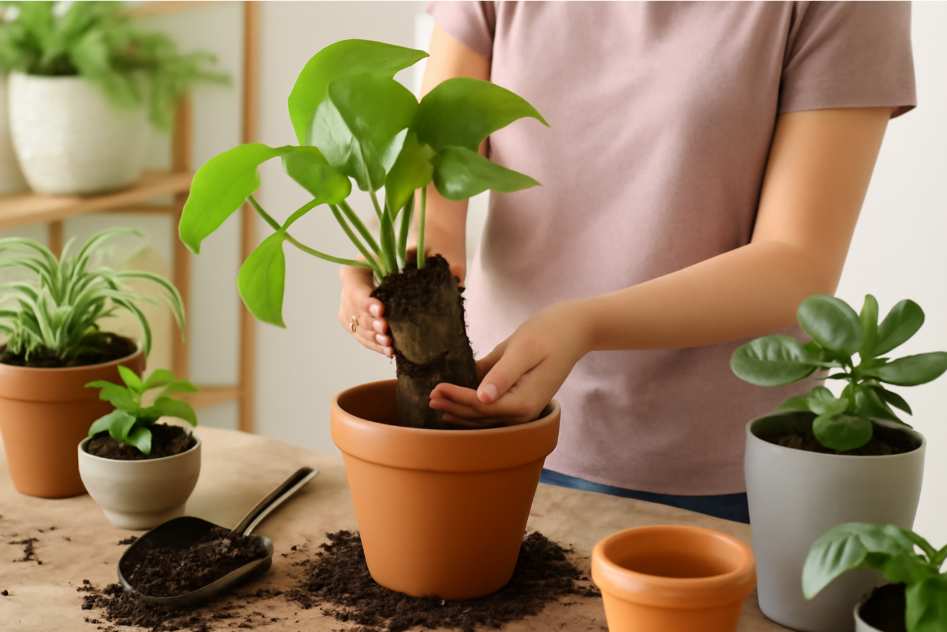
Step-by-Step Guide on How to Repot Indoor Plants
Repotting doesn’t have to be complicated! Follow these easy steps, and you’ll have your plant feeling right at home in its new pot. Let’s dive into this simple, beginner-friendly guide to help your plant thrive 🌿.

Step 1: Prepare Your New Pot
Before you do anything, make sure your new pot is ready for the plant. Ensure it has drainage holes to prevent water from building up and causing root rot. If needed, add a layer of rocks or gravel at the bottom for better drainage.
Step 2: Gently Remove the Plant from Its Old Pot
Carefully take your plant out of its old pot. Hold the plant gently by its base or stem, and tip the pot sideways. If the plant is stuck, tap the sides or gently squeeze the pot to loosen the soil. For stubborn plants, you may need to run a knife around the inside edge of the pot to help it slide out more easily.
Step 3: Inspect and Trim the Roots
Once the plant is free, it’s time to inspect the roots. If they’re tightly wound or circling the root ball, gently loosen them with your fingers. Trim any dead or rotting roots with clean scissors or pruning shears. Healthy roots should be white or light-colored—anything brown or mushy should be removed. This will encourage new root growth. 🌱
Step 4: Place the Plant in the New Pot
Now, it’s time to put the plant in its new home! Add a layer of fresh potting mix to the bottom of the new pot, creating a small mound in the center. Place your plant on top of the soil, ensuring the base of the stem is level with the rim of the pot. Center the plant so it’s stable and upright.
Step 5: Add Fresh Potting Mix
Carefully fill in around the root ball with fresh potting mix. Tap the sides of the pot gently to help the soil settle. Be sure not to bury the plant too deep—keep the soil level the same as it was in the old pot. Leave about half an inch of space from the top of the pot for watering.
Step 6: Water Thoroughly
After repotting, give your plant a good watering to help it settle into its new home. This will also remove any air pockets in the soil. Ensure the water drains out through the holes at the bottom. Watering well after repotting is essential to reduce stress on the plant and give it the best chance to adapt.
Step 7: Let Your Plant Adjust
Now that your plant is repotted, give it time to adjust to its new environment. Place it in a location with bright, indirect light and avoid direct sunlight for a few days. Don’t fertilize immediately—let the plant settle in for about 2-3 weeks before adding any fertilizer. 🌞
By following these simple steps, you’ve given your plant the space and care it needs to grow stronger and healthier. With a little patience, you’ll see your plant thrive in its new home! 😊
Aftercare Tips for Repotted Indoor Plants
Repotting is just the first step in helping your plant thrive in its new home. After the big move, your plant will need some extra attention to settle in and adjust. Here are some simple aftercare tips to ensure your plant stays happy and healthy 🌿.

1. Water Carefully
Right after repotting, give your plant a good watering to help it settle in. Make sure the water drains out of the pot to avoid waterlogging the roots. In the days following, water the plant only when the soil feels dry to the touch. Overwatering can stress out the plant, especially when it’s adjusting to its new home. 💧
2. Avoid Fertilizing Immediately
After repotting, your plant is still adjusting to the fresh soil. Wait for about 2-3 weeks before fertilizing. Fertilizing too soon can burn the roots or encourage excessive growth that the plant isn’t ready for. Once it’s settled, you can resume feeding your plant with a gentle, balanced fertilizer.
3. Give It Time to Adapt
Your plant might need a little time to recover after the stress of repotting. During the first few weeks, keep it in a bright, indirect light location to help it adapt without the shock of direct sunlight. Avoid moving it around too much during this time; stability is key. 🌞
4. Watch for Stress Signs
It’s normal for plants to show some signs of stress after repotting, like drooping or yellowing leaves. However, if these symptoms persist for more than a few weeks, it could be a sign of overwatering, root damage, or poor soil. Keep an eye on your plant, but don’t panic—most plants bounce back with proper care.
5. Check for Pests
Repotting can disturb the roots and soil, which may stir up pests. After repotting, inspect the leaves, stems, and soil for any signs of pests like aphids, spider mites, or fungus gnats. If you spot anything, treat your plant with natural pest control methods to prevent further damage. 🐞
By following these aftercare steps, your plant will have the best chance of thriving in its new pot. With a little patience and attention, your plant will grow stronger and healthier, ready to brighten your space for years to come! 🌱
Common Mistakes to Avoid When Repotting Indoor Plants
Repotting your indoor plants can be a rewarding experience, but it’s easy to make mistakes, especially if you’re new to it. To help you avoid common pitfalls, here are the mistakes you should watch out for, along with tips to ensure your plants thrive after their big move. 🌿

1. Choosing the Wrong Pot Size
One of the most common mistakes is picking a pot that’s too large for your plant. While it might seem like a good idea to give your plant extra space, a pot that’s too big can lead to overwatering, as the plant’s roots won’t be able to absorb moisture effectively. Stick to a pot that’s just 1-2 inches larger than the current one to avoid this issue.
2. Planting Too Deep
When repotting, it’s important to keep the plant’s root ball at the same level it was in the old pot. Planting too deeply can cause the stem to rot, while planting too shallowly can expose the roots to air and stress the plant. Ensure the base of the plant is at the same height as it was in its previous container. 🌱
3. Overwatering After Repotting
After repotting, your plant will need some time to adjust to its new environment. Watering immediately after repotting is fine, but be cautious not to overwater in the following weeks. Overwatering can lead to root rot, especially in plants that haven’t yet settled into their new soil. Water only when the top inch of soil feels dry to the touch. 💧
4. Not Preparing the Pot for Drainage
Drainage is essential for plant health. A common mistake is forgetting to ensure your new pot has drainage holes. Without these, excess water will accumulate, causing root rot. Always double-check that your pot has at least one hole at the bottom, and if not, consider drilling your own or choosing another pot.
5. Using the Wrong Type of Soil
Not all plants need the same type of soil. Using the wrong soil mix can hinder root growth or even cause plant stress. For example, succulents need a fast-draining mix, while tropical plants prefer soil that retains moisture. Make sure to choose the appropriate soil based on your plant’s needs. 🪴
6. Repotting Too Frequently
While repotting is essential, doing it too often can actually harm your plant. Plants should only be repotted when they’ve outgrown their current pot or if the soil is exhausted. Repotting every year isn’t necessary for most plants—once every 1-2 years is usually enough. Frequent repotting can stress the plant and slow its growth.
7. Ignoring the Plant’s Specific Needs
Different plants have different requirements when it comes to repotting. Cacti and succulents prefer shallow pots, while tropical plants do better in deeper, moisture-retaining pots. Be sure to research the specific needs of your plant to ensure it gets the right environment.
Avoiding these common mistakes will help your plant settle into its new home with less stress and more potential for healthy growth. With a little care and attention, your plant will flourish in its new pot and continue to thrive! 🌸
Repotting Indoor Plants – Best Practices for Specific Types of Plants
Not all plants are created equal, and when it comes to repotting, each type has its own unique needs. To ensure you’re giving your plants the best care possible, here are some best practices for repotting different types of indoor plants. 🌿
1. Succulents and Cacti
Succulents and cacti are low-maintenance plants, but they have specific repotting needs:
- Shallow Pots: Use a shallow pot that allows their roots to spread out without suffocating.
- Well-Draining Soil: Opt for a cactus or succulent mix that drains quickly, as these plants don’t like sitting in moisture.
- Repotting Frequency: Succulents generally need to be repotted every 2-3 years or when they’ve outgrown their pot. Over-repotting can lead to root rot. 🏜️
2. Tropical Plants (e.g., Ferns, Philodendrons)
Tropical plants love moisture and humidity, so keep these tips in mind:
- Deeper Pots: These plants typically have longer roots that need more depth. Choose a slightly deeper pot to give them room to grow.
- Moisture-Retaining Soil: Use a peat-based potting mix that retains moisture without becoming soggy. A mix with perlite will help with aeration.
- Repotting Frequency: Tropical plants tend to need repotting more often—every 1-2 years—as they grow quickly in warm, humid conditions. 🌿
3. Orchids
Orchids have unique requirements when it comes to repotting:
- Specialized Orchid Mix: Use a bark-based mix designed specifically for orchids. This allows for good airflow and drainage, which orchids love.
- Repotting Timing: Only repot orchids when the roots have outgrown the pot or the mix breaks down. The best time to repot is after the blooming cycle has finished. 🌸
- Avoid Overwatering: Orchids are sensitive to overwatering. After repotting, let the plant dry out before watering again.
4. Herbs (e.g., Basil, Mint, Parsley)
Herbs are typically fast-growing and need regular repotting to stay healthy:
- Shallow, Wide Pots: Herbs often have shallow root systems, so a wide pot will give them plenty of room to spread out.
- Well-Draining Soil: Use a light, loamy soil mix that drains well. Herbs don’t like to sit in waterlogged soil, so proper drainage is crucial.
- Repotting Frequency: Repot herbs annually or when they start to look crowded or root-bound. 🌿
5. Foliage Plants (e.g., Spider Plants, Snake Plants)
Foliage plants are quite adaptable, but they still need the right care when repotting:
- Medium-Sized Pots: Choose a pot that’s just 1-2 inches larger than the current one. These plants don’t need much extra space and can thrive with a moderate amount of room.
- Balanced Soil Mix: Use a well-draining, all-purpose potting mix. These plants don’t mind some moisture but prefer it not to stay too wet.
- Repotting Frequency: Foliage plants should be repotted every 1-2 years, especially when their growth slows or roots are visible at the bottom of the pot.
By following these plant-specific tips, you can ensure that each plant receives the right environment and care it needs to thrive. Whether it’s succulents, tropicals, or orchids, understanding the unique needs of your indoor plants will keep them healthy and happy for years to come! 🌸

Repotting your indoor plants is an essential step in helping them grow stronger, healthier, and more vibrant. By choosing the right pot, following the proper steps, and providing the right aftercare, you can give your plants the best chance to thrive in their new environment. Whether you’re repotting a succulent, orchid, or foliage plant, understanding their unique needs ensures that they’ll continue to flourish and add beauty to your space. 🌱
Remember, repotting is a simple yet powerful way to support your plants’ growth and well-being. So, don’t wait too long—if your plant is showing signs of being root-bound or struggling, it’s time to repot. With the knowledge and tips from this guide, you’re ready to take action and give your plants the care they deserve.
Happy repotting, and here’s to healthier, thriving plants! 🌿😊